Here at last is the long awaited tutorial that I've been promising you all.
I am so delighted that my blankets have inspired many of you to try it!
Years ago I began experimenting with this joining method
This is written in US crochet terms and as a beginner,
I found this an added stress that I could do without,
having to remember to translate the stitches into UK terms all the time.
There are of course many conversion charts around
As you know I'm allergic to ends and so prefer methods of joining in 1 go,
with the bonus of only 2 ends at the start and the finish.
I am a big fan of continuous join as you go (CJAYG) for granny squares
So it was a natural progression
for me to develop my own way of using the flat braid join
in a continuous fashion. I began my learning
She makes wonderful inspiring colouful blankets
that are real works of art and has a
tutorial in US terms.
So it is with many thanks to these great American Crochet Artists,
that I have learnt and arrived at this point,
where I can present to you my version of
the continuous flat braid join using English crochet terms.
The flat braid join has a delicate lace appearance
and adds a wonderful 3D texture to the completed blanket.
In The Raspberry Blanket shown above I have first edged each square
in 1 round of UK dc using my joining colour raspberry,
this gives a wider look to the join.
This is not necessary
and indeed it may be your choice to make the last round in different colours,
which makes the squares look bigger and the join look narrower,
as in the Moroccan Spice blanket below. It is totally your choice.
So once you have made your choice you can begin.
I like the wider join with the extra round of dc in the joining colour,
making the join a big feature of the blanket.
So the first step in my Peacock Blanket,
was to edge each square in double crochet
using my joining colour, making 3 dc in the corner stitch.
You can use this joining method around any squares
and this round of dc makes a perfect base to start from.
If you missed the previous post
about the making of The Peacock Blanket you can read it
Now I hear you all worrying
about how many stitches are needed on the side of the square . . .
don't worry,
this joining method is very forgiving
as is all crochet and it will be easy to adjust later!
The important thing is that your squares are square and not rectangular
so that they will have the same number of loops for joining on each side.
Now the most important part of Continuous Join As You Go (CJAYG)
is that you understand the direction in that you will work.
You will find this 'map' helpful.
Right handers will start at the top right corner and folow the direction in red.
Left handers will start at the top left corner and make a mirror image.
This tutorial is written in UK crochet terms
Abbreviations used :
dc = double crochet
tr = treble
htr = half treble
dtr = double treble
Start by attaching the yarn to the right hand stitch
of the 3 dc in the corner and make 5 chain for the corner loop.
Then make 1 dc in the left stitch of the 3 dc in the corner.
This has formed the corner loop.
Next make 3 chain,
miss a stitch, then dc into the 2nd stitch.
Continue this all the way along the side of the first square
(dc 3 chain miss a stitch dc)
ending with a dc in the 1st of the 3 dcs in the corner.
You can see here I have 11 loops along the side
and 1 loop in the corner on the right.
It is VERY IMPORTANT that you count
and make sure you have the same amount of loops
on each side of every square!
As I said before crochet is very forgiving and it is easy to cheat!
If you have made a mistake do not worry,
no one will notice if you make the last loop without missing a stitch
or indeed if you had to miss 2 stitches! The important thing
is that I have 11 loops on each side, in between my 2 corner loops.
(Here I would like to add
that you can alter the number of chain used for each loop if you wish.
Using 2 chain will make a tighter braid and using 4 would make it looser.)
Make 5 chain for the corner loop
and dc in the 3rd dc in the corner
then continue making the loops along the 2nd side of the first square
and again make 5 chain ready for the corner loop.
We are then going to change direction
and follow the direction shown by the yarn here.
At this point I might add
that my squares do not look as straight as I would like,
they still have a round appearance.
Don't panic, trust me, when they are all joined
they pull each other straight and you will end up with a nice perpendicular join!
Adding the next square
Now we are going to join the 1st square to the 2nd
by making a dc into the 3rd dc of the corner of square 2.
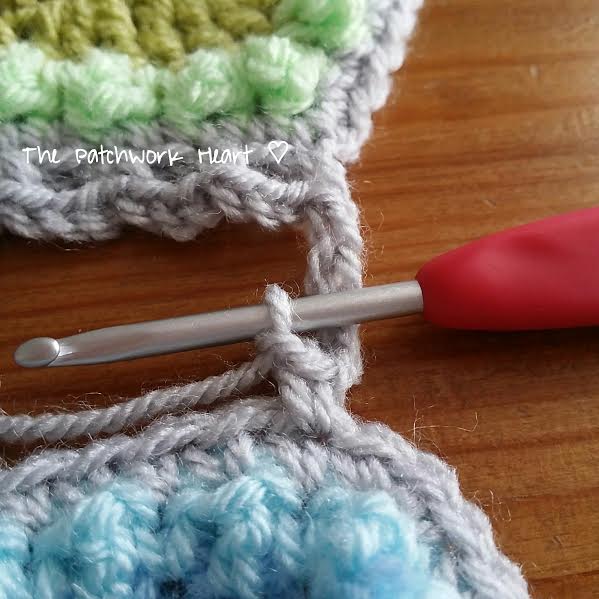
Here we begin the flat braid join.
Make 1 chain (the first of the 3 for each loop)
then take your hook out of the stitch
and place it from back to front
through the first side loop on square 1.
Make 1 chain (the 2nd of the 3)
then make another chain (the 3rd of the 3).
This is the first loop made
and we are ready to connect back to square 2
so miss a stitch then dc in the next.
Make 1 chain, take the hook out of the stitch
and repeat the joining process along the side of the square
until you reach the corner.
For the corner we have 5 stitches to use
so chain 2 take the hook out
pass it through the loop from back to front
chain 1 (3rd of the 5)
then chain 2.
Now continue along the side of top of the 2nd square
following the direction of the yarn.
Keep on, across the top, down the side, add the next square, up to the top
and repeat till you have joined the first row of squares.
Completing the bottom of a row
I advise you keep referring back to this map
and you will next work the loops along the bottom of the squares of row 1.
So 5 chain miss a stitch dc for a corner
and 3 chain miss a stitch dc along the sides.
When you come to cross the join remember you have 5 stitches to use.
So 2 chain, hook out and replace it though the loop back to front,
1 chain over the loop then 2 chain to complete the 5.
Continue to the end of the row.
Stop after the 11th loop, ending with the dc in the first of the corner 3.
Next we are ready to attach row 2.
Adding a new row
Chain 5 for the corner loop
and dc into the left hand 3rd dc of the corner in the new square.
Join the new square to the previous square
making 11 loops along then arriving at the corner.
(Note there are 11 loops on my Circle of Friends squares
but if you have an alternative pattern you will have a different amount of loops.)
Joining the 3rd square at a corner
Make 1 dc in the right dc of the 3 in the corner.
chain 2
take hook out of stitch and place through corner loop
of the square above and left.
Pick up the stitch and make 1 chain to join
then 2 chain to complete the corner 5
and dc into the left dc of the corner 3 to complete the corner loop.
Continue along the side of this new square,
turn at the bottom and add the next.
Work up till you get to the top
and are ready to complete the junction of the 4 corners.
Joining the 4th square at the crossroads
After the dc to begin the corner make the 2 chain.
Take the hook out of the stitch
and pass it under the loop diagonally opposite you back to front.
Make 1 chain ( the centre of the 5) this is the anchor of the cross over
then 2 chain to finish the corner loop
and dc in the left dc of the 3 dcs in the corner.
The completed corner should be strong and look like this.
Continue in this way adding all the rows.
Once the final row has been added
follow the joining direction shown on the map
and complete the final 2 sides of the blanket.
Tadaa your blanket is now in 1 piece with only 2 ends to sew in.
It is now ready for a border!
Border time
The perfectionist in me didn't like the curved edge of the final blanket.
I chose to add a final round of differing stitches to even it out.
Basically I've used longer stitches near the corners
and graduated to the shortest stitches at the centre of the squares.
Starting in the top right corner I made 2 dtr in the corner loop,
then in each loop across the square
2 dtr, 2 tr, 2 tr, 2htr, 2 htr, 2dc, 2htr, 2htr, 2 tr, 2 tr, 2 dtr
and 2 dtr in the corner loop.
You can see this gave a much flatter foundation row
on which to start the border.
I have used border 93 from the book
this is a lovely lace border which I felt complimented the flat braid join.
I'm sorry that I'm not able to write a tutorial for the border
as it is from a book,
but I highly recommend this book.
It is written in US terms but has written instructions
and charts too which make it easy to manage.
The yarn I used for my blanket is
Stylecraft Special DK
with a 3.5mm hook. You can find the colour recipe
It has been my pleasure to write this tutorial.
Following over a year of ill heath and time off work
it is with much sadness that I have now left my job as a Maths teacher.
However, being positive I choose to see this as the beginning
of my new career, as a full time crochet artist.
It is my pleasure to teach and share my crochet skills.
God has given each of you some special abilities,
use them to help each other . . . 1 Peter 4 v 10
I now am exploring the path I will take,
dividing my time between making items to sell in my
taking commissions for blankets,
posting daily on my busy
and
pages
and writing here on my blog to inspire you.
If you have enjoyed this free tutorial,
please consider making a donation using the PayPal donate app on the sidebar.
Writing a tutorial like this takes many days of my time,
time when I am not crocheting and so not earning money to put food on the table.
Donations help to ensure that more tutorials can be written for your use.
I wish you much fun and success with this method.
Do post photos on the Facebook group
"Crochet Inspired by The Patchwork Heart"
and if you have any problems the ladies there will be sure to help.
Happy hookin
Heather
X X X
This post was sponsored by Stylecraft Yarns